

Mid-Side Recording Technique for Acoustic Guitar
Recording an acoustic guitar should be simple, right? Just point a microphone at the sound hole and hot the red button!
Not quite. In fact, pointing the mic at the soundhole is about the worst thing you can do. It will more than likely sound horrible recording from that position.
There is an art to capturing the acoustic guitar in a recording, and many different approaches (which will of course yield many different results).
The first thing to consider is how the recording will be used? Will it be a solo guitar instrumental? Will it be placed in a band setting? If placed in a band setting, what other instruments will be featured in the recording as well. What role will the guitar play in the recording? Will it be used to accompany the voice, or perhaps a solo instrument (maybe even another guitar)?
Once we have determined these questions, we then need to consider the location we will be recording in. The environment can (more than likely, will) have a big bearing on the result.
At one point I did a lot of recording in a dedicated studio located near Sydney Uni, and within the studio they had built a room specifically for acoustic guitar. The owners had not scrimped on any part of that room, from the wood panelling to the Neumann KM84 match pair of microphones used for acoustic guitars.
It has been a couple of years since I have recorded anywhere other than my home setup, and more than that since I have recorded regularly in a dedicated studio environment.
It is not because I have stopped playing on recordings for others, but because technology has improved so much that I can do most of the work from my home now, and not have to travel.
Today we will discuss one approach to recording the acoustic, that of the ‘mid-side’ mic’ing technique. It is a simple setup, and can produce very good results for an acoustic guitar as a solo instrument or where it shall be used to fill out a band recording.
For the mid-side technique, we require 2 different microphones. One most be directional, and the other have a figure 8 polar pattern.
What does this mean?
Let’s look at the following diagram, and then discuss how to interpret this:
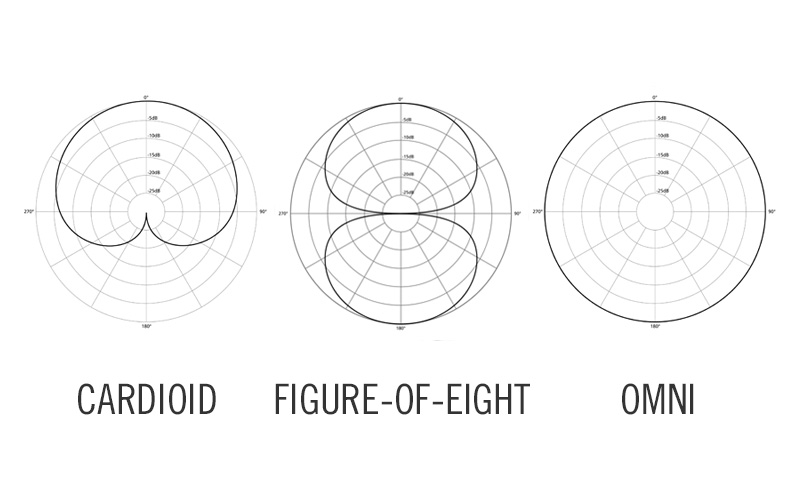
The polar pattern determines the direction of what sound sources the microphone will pick up, and what it will reject. A cardioid pattern will mostly pick up sounds directly in front, with some spill from the sides. Sounds behind the mic will be rejected. The figure of 8 pattern picks ups on both sides of the mic, while rejecting the sides to some extent. And the omni pattern picks up sounds from 360 degrees.
When positioning the mics, we need to set them as close to one another as possible.

Here I am using a Sontronics small-diaphragm condenser mic for the mid position, and a Rode ribbon mic in the side position. The Sontronics and Rode are positioned very close to one another, and around 30 centimetres back from the guitar.
They are pointing at the 12th fret area, which will capture the overall sound of the guitar.
Both mics will record at the same time. Once complete, the side track will be duplicated in the DAW, and then one track panned hard left and the other panned hard right. The polarity will be reversed on one of the tracks. Next up, a side track group channel will be created for both tracks, which will allow for easy adjustment of the level. https://www.facebook.com/plugins/video.php?href=https%3A%2F%2Fwww.facebook.com%2Fguitarlessonswollongong%2Fvideos%2F389195029150549%2F&show_text=0&width=560
This will result in a lush stereo image, but still retain mono compatibility when needed, due to the mid mic recording. This recording also works very well for both solo guitar and guitar in a mix.
Once you are happy with the levels of the respective tracks, you can then edit and apply effects to taste.
And we will discuss that in another post.
Leave a Reply